One of the great features of Android is how easy it is to tap into existing functionality. Scanning Barcodes and Quick Response (QR) codes is a good example. Google have a free scanning App that can be accessed via an Intent. This tutorial is an example of how to access the Google Barcode/QR code Scanner.
In this tutorial, we show you how to use Zxing libraries in Android app. See flowing Steps


Obtain the zxing src code
First go to the ZXing project from here http://code.google.com/p/zxing/downloads/list, and download projects file ZXing-2.1.zip
Include ZXing Android into your project.
From downloaded archive take the android project “android” and jar file core.jar from core directory, and create from it eclipse project:
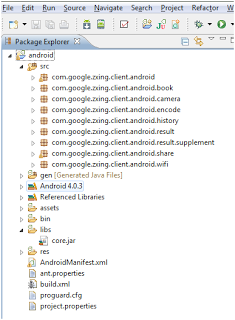
You must include core.jar into the build path, and you should see all zxing client packages like here.
Then mark this project as Android Library project:, R- click on Zxing project and select properties,

by right click on your new AndroScan project and select android tab, then click add add available library project from there and apply OK.

Also include core.jar into the build path. Now we have two projects, one as library, one as your created project.
in your project Create files as
1) Android Layout Files
Simpel layout file, display a button and textview on screen.
File : res/layout/activity_main.xml
<LinearLayout xmlns:android="http://schemas.android.com/apk/res/android"
android:layout_width="fill_parent"
android:layout_height="fill_parent"
android:background="@drawable/bgimag"
android:orientation="vertical">
<Button
android:id="@+id/btnScan"
android:layout_width="fill_parent"
android:layout_height="wrap_content"
android:layout_weight="1"
android:text="Scan"
android:textColor="@android:color/white"
android:textSize="25sp"
android:textStyle="bold" />
<TextView
android:id="@+id/tvStatuslbl"
android:layout_width="match_parent"
android:layout_height="wrap_content"
android:layout_weight="0.03"
android:text="Status"
android:textAppearance="?android:attr/textAppearanceLarge"
android:textColor="@android:color/white" />
<TextView
android:id="@+id/tvStatus"
android:layout_width="match_parent"
android:layout_height="wrap_content"
android:layout_weight="1"
android:textColor="@android:color/white"
android:textAppearance="?android:attr/textAppearanceLarge" />
<TextView
android:id="@+id/tvResultlbl"
android:layout_width="match_parent"
android:layout_height="wrap_content"
android:layout_weight="0.03"
android:text="Result"
android:textColor="@android:color/white" />
<TextView
android:id="@+id/tvResult"
android:layout_width="match_parent"
android:layout_height="wrap_content"
android:layout_weight="2.95"
android:textColor="@android:color/white"
/>
</LinearLayout>
2) MainActivity
When user click on Scan s button, display the camera scanner and scan Bar code, QR code, And gives result back to interface screen on textview.
File : MainActivity.java
package in.blogspot.khurram2java;
import android.app.Activity;
import android.content.Intent;
import android.os.Bundle;
import android.view.View;
import android.view.View.OnClickListener;
import android.widget.Button;
import android.widget.TextView;
import android.widget.Toast;
public class MainActivity extends Activity {
TextView tvStatus;
TextView tvResult;
@Override
protected void onCreate(Bundle savedInstanceState) {
super.onCreate(savedInstanceState);
setContentView(R.layout.activity_main);
tvStatus = (TextView) findViewById(R.id.tvStatus);
tvResult = (TextView) findViewById(R.id.tvResult);
Button scanBtn = (Button) findViewById(R.id.btnScan);
//in some trigger function e.g. button press within your code you should add:
scanBtn.setOnClickListener(new OnClickListener() {
@Override
public void onClick(View v) {
// TODO Auto-generated method stub
try {
Intent intent = new Intent(
"com.google.zxing.client.android.SCAN");
intent.putExtra("SCAN_MODE", "QR_CODE_MODE,PRODUCT_MODE");
startActivityForResult(intent, 0);
} catch (Exception e) {
// TODO Auto-generated catch block
e.printStackTrace();
Toast.makeText(getApplicationContext(), "ERROR:" + e, 1).show();
}
}
});
}
//In the same activity you’ll need the following to retrieve the results:
public void onActivityResult(int requestCode, int resultCode, Intent intent) {
if (requestCode == 0) {
if (resultCode == RESULT_OK) {
tvStatus.setText(intent.getStringExtra("SCAN_RESULT_FORMAT"));
tvResult.setText(intent.getStringExtra("SCAN_RESULT"));
} else if (resultCode == RESULT_CANCELED) {
tvStatus.setText("Press a button to start a scan.");
tvResult.setText("Scan cancelled.");
}
}
}
}
3) AndroidManifest.xml
Android app has no idea how to handle the scan intent. To fix this you just need to copy the following into your AndroidManifest.xml:
<activity
android:name="com.google.zxing.client.android.CaptureActivity"
android:configChanges="orientation|keyboardHidden"
android:screenOrientation="landscape"
android:theme="@android:style/Theme.NoTitleBar.Fullscreen"
android:windowSoftInputMode="stateAlwaysHidden" >
<intent-filter>
<action android:name="android.intent.action.MAIN" />
<category android:name="android.intent.category.DEFAULT" />
</intent-filter>
<intent-filter>
<action android:name="com.google.zxing.client.android.SCAN" />
<category android:name="android.intent.category.DEFAULT" />
</intent-filter>
</activity>
And I would say, “Just one more thing!”. Add this permission to the top of your AndroidManifest.xml:
<uses-permissionandroid:name="android.permission.CAMERA"/>
<uses-permissionandroid:name="android.permission.FLASHLIGHT"/>
AndroidManifest.xml file look like
<?xml version="1.0" encoding="utf-8"?>
<manifest xmlns:android="http://schemas.android.com/apk/res/android"
package="in.blogspot.khurram2java"
android:versionCode="1"
android:versionName="1.0" >
<uses-sdk
android:minSdkVersion="8"
android:targetSdkVersion="16" />
<uses-permission android:name="android.permission.CAMERA" />
<uses-permission android:name="android.permission.FLASHLIGHT" />
<application
android:allowBackup="true"
android:icon="@drawable/ic_launcher"
android:label="@string/app_name"
android:theme="@style/AppTheme" >
<activity
android:name="in.blogspot.khurram2java.MainActivity"
android:label="@string/app_name" >
<intent-filter>
<action android:name="android.intent.action.MAIN" />
<category android:name="android.intent.category.LAUNCHER" />
</intent-filter>
</activity>
<activity
android:name="com.google.zxing.client.android.CaptureActivity"
android:configChanges="orientation|keyboardHidden"
android:screenOrientation="landscape"
android:theme="@android:style/Theme.NoTitleBar.Fullscreen"
android:windowSoftInputMode="stateAlwaysHidden" >
<intent-filter>
<action android:name="android.intent.action.MAIN" />
<category android:name="android.intent.category.DEFAULT" />
</intent-filter>
<intent-filter>
<action android:name="com.google.zxing.client.android.SCAN" />
<category android:name="android.intent.category.DEFAULT" />
</intent-filter>
</activity>
</application>
</manifest>
I hope its usefull :)
Download Complete working Source Code , Just Import project in your eclipse.
http://www.mediafire.com/?2a3c39vfafa92nh
Very useful introduction, let me know the principle of barcode scan, thank you very much.
ReplyDeleteThank you g=for sharing very informative blog
ReplyDeletebarcode scanner
Very nice post. Thanks for sharing good informative content Barcode scanners in Kochi Kerala
ReplyDeleteHey! I am Gregory Gladiya. I am here from the technical team to assist you in resolving the Epson printer issues. For further information on on driver install, click here: Epson ET 2760 Driver. Here you will be able to find a solution to resolve issues that are faced with Epson printers of any model.
ReplyDelete